With e-commerce thriving, many entrepreneurs are looking to online platforms to start or boost their business. Given Amazon’s seller-friendly logistics offerings and status as the dominant e-commerce platform, it’s no surprise that many business owners are choosing to expand their operations on the platform.
If you’re looking to start an Amazon business of your own or take your current business to the next level, it’s time to register an account on Amazon Seller Central! This platform is where you’ll be able to manage your inventory, create product listings, track sales and revenue, and more. Setting up an account on the platform can be overwhelming at first (especially if you’re new to the Amazon space), but don’t worry! In this article, we’ll cover the basics on how to create an Amazon seller account and all the information you’ll need to get started. Let’s begin!
What You Need for Starting an Amazon Seller Account
The signup process is quick and easy, but you’ll need a number of items in order to be approved when signing up. Before you create an Amazon Seller account for your business, let’s go over all the things you’ll need to ensure a smooth approval process and that you have everything in order. Keep in mind that the information requested below is part of a five-part signup process in which Amazon takes Business Information, Seller Information, Billing Information, Store Information, and Verification (which you will see later on).
- Business email address or an existing Amazon customer account
- Internationally chargeable credit card
- Government ID (for verification purposes to protect sellers and customers)
- Tax information
- A cell phone and phone number
- Bank account information for where Amazon can send your proceeds from sales
In addition to the list of Amazon seller account requirements above, you’ll need to be a resident of these approved countries to be eligible for seller registration without further information. Check and verify that you are before proceeding to the next steps.
While providing personal information online can be nerve-wracking, it’s vital that Amazon is able to authenticate your existence and business for safe and smooth transactions between buyers and sellers.
1. Register or Log Into Amazon
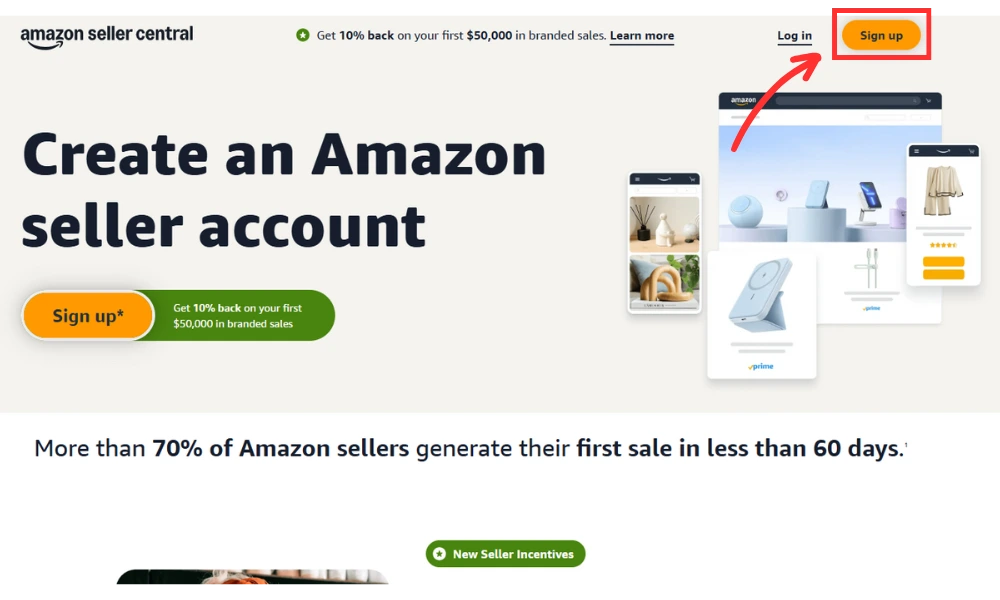
Once you have all the information you need for the approval portion of the process, you’re ready to set up an Amazon Seller account. To get started, visit the Amazon Seller Central login and sign-up page. Then, select the “Learn More” option near the top-right of the page to create your account. You can either sign in using your Amazon customer login, or create a new login entirely.
2. Choose Your Selling Plan
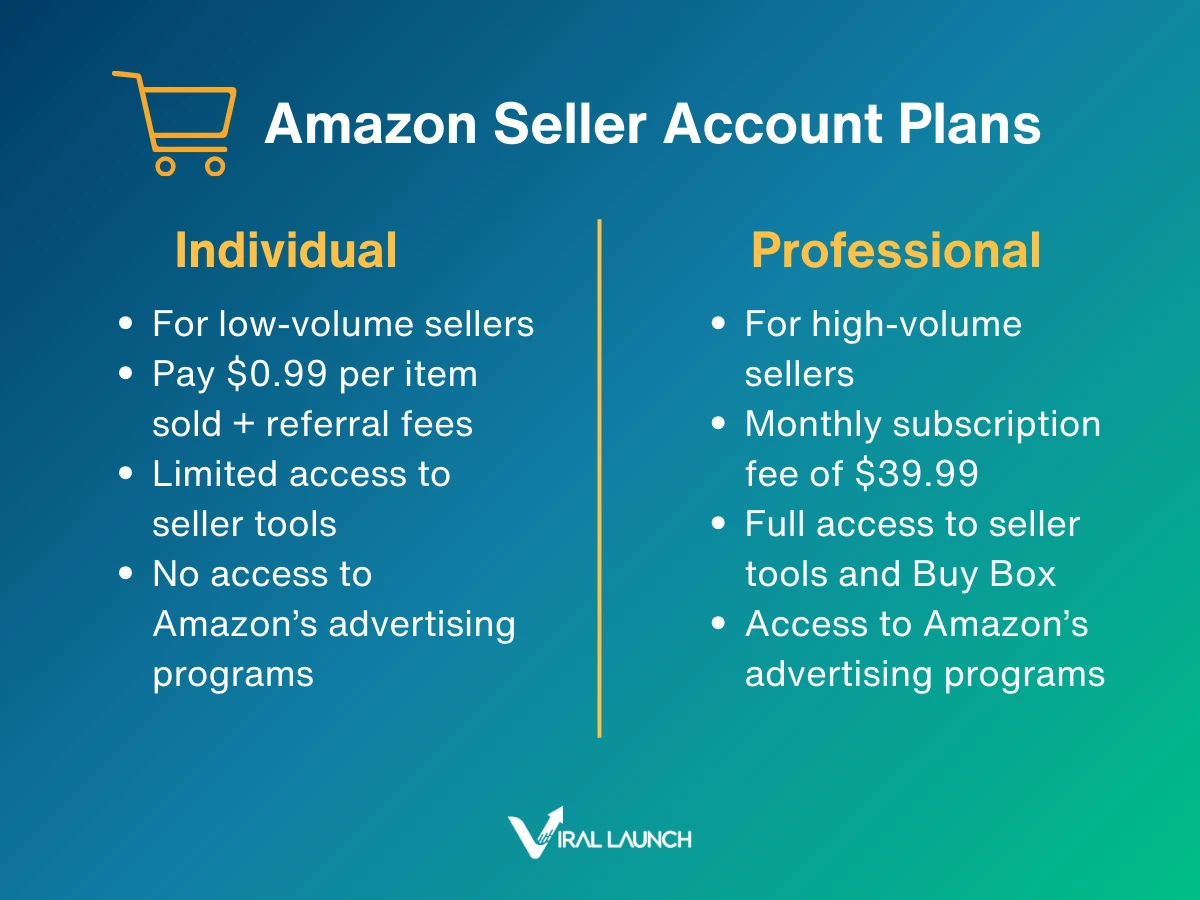
Before providing any of your information, you’ll want to do a little research and decide which of Amazon’s selling plans makes the most sense for your business. For the most part, the Professional plan fits the needs of serious Amazon sellers, but it all depends on your goals, resources, and where you are in your selling journey. Below are the different Amazon seller account plans you can choose from.
Individual
While the Individual seller plan doesn’t have a monthly payment, it does require a $0.99 fee every time you sell an item. This plan makes sense for sellers still deciding on a product or totaling less than 40 units per month, so it’s a more cost-efficient option.
Select the Individual Plan if:
- You plan to sell less than 40 units a month
- You plan to sell from time to time
- You’re still searching for a product to sell
- You’re testing the Amazon market with only a few products
- You’re not going to advertise or use advanced seller tools (this plan does not provide access to inventory tools)
Once you’ve decided on a product or plan on increasing your sales, you can upgrade to a Professional account at any time.
Professional
The Professional seller plan requires a flat $39.99 monthly payment, no matter how many items you sell within the month. In addition to the $39.99 monthly payment, Amazon collects a seller fee (a percentage of the total transaction that varies by product category) on each of your sales.
Additionally, sellers on the Professional plan gain access to many marketing and reporting tools and other Amazon benefits. One important perk you might consider is Brand Registry, which protects your business from fraud and abuse while allowing additional perks on your listing.
Select the Professional Plan if:
- You plan to sell more than 40 units a month
- You’re looking to create a brand on Amazon
- You’re going to leverage Amazon marketing, selling, and reporting tools
- You want to enroll in seller programs
- You plan to sell products in restricted categories
- You want to advertise your products using the Amazon Advertising platform
- You intend to qualify for top placement on product detail pages
- You plan to include special offerings and promotions such as free shipping
While there are notable differences between the two, both the Professional and Individual seller plans provide an opportunity to add new products to the Amazon catalog and to grow your business with the Fulfillment by Amazon (FBA) service.
3. Navigate to the Amazon Seller Central Page
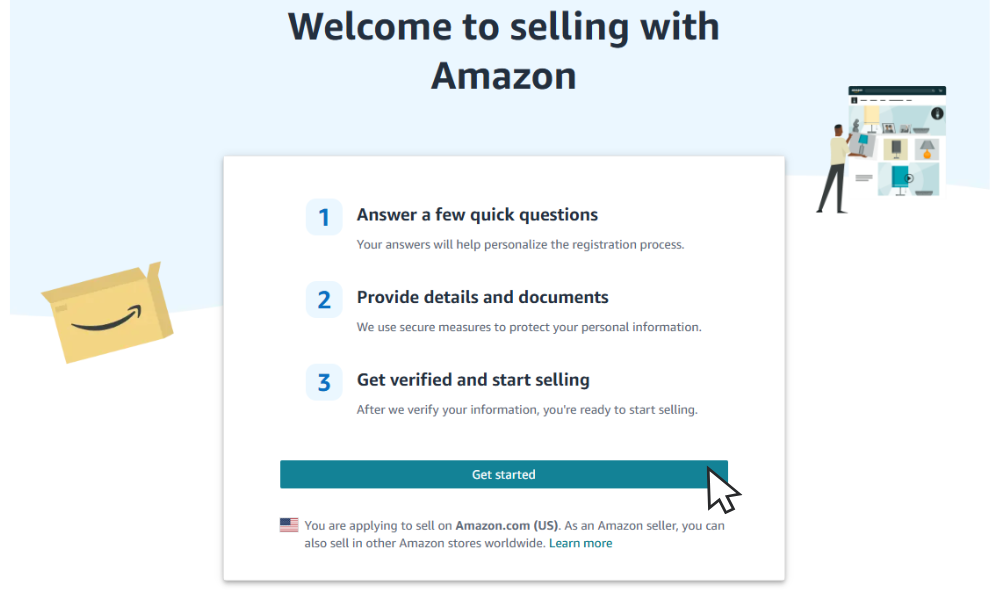
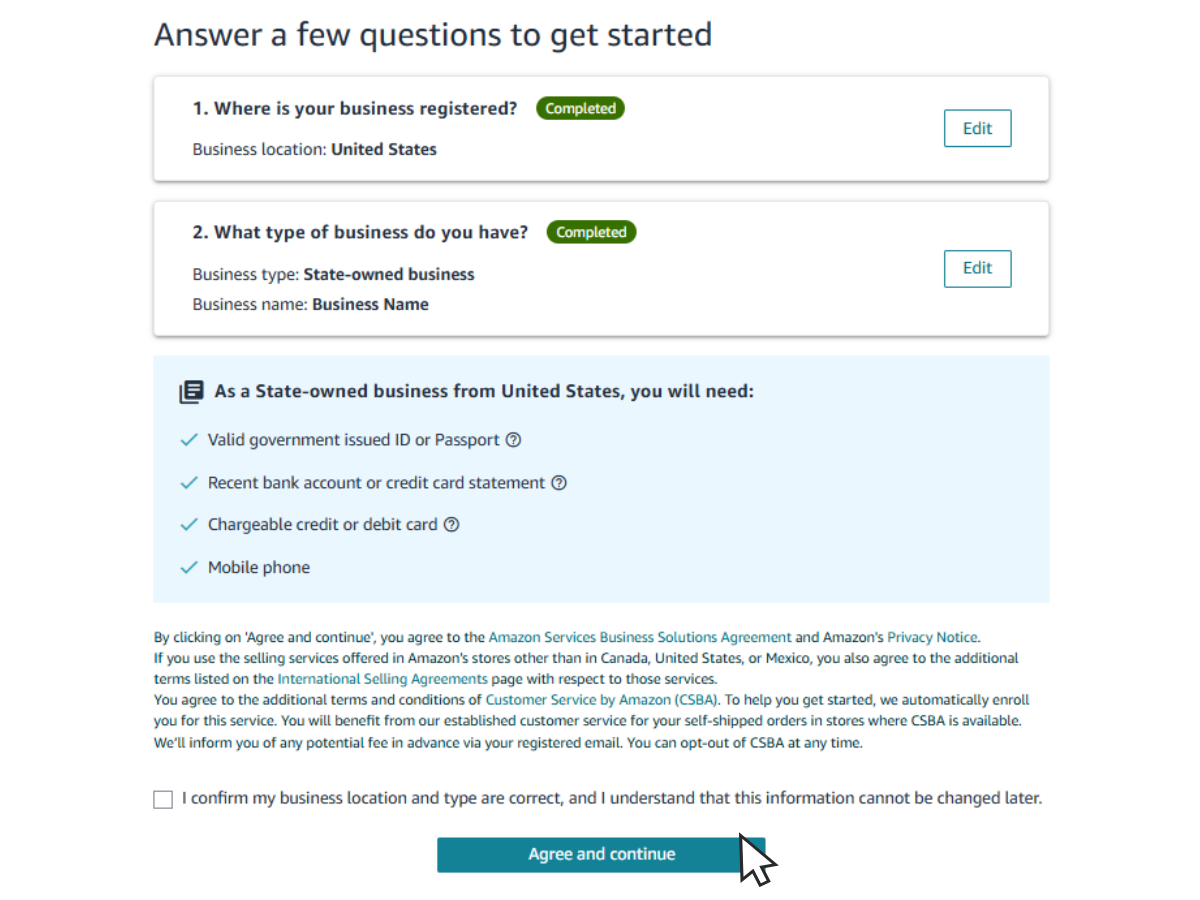
Once you’ve chosen a seller plan, it’s time to begin the Amazon seller registration process. First, navigate to the Amazon Seller Central homepage and click “Sign Up.” By this point, you should have an Amazon account to use, so you can enter the login credentials for this step. After you enter your email and password, you should see the following screen below. Click on “Get Started.”
4. Provide Your Business Information
First, you’ll need to provide basic information about your business, such as its location (the country where your business is legally registered) and type (e.g. privately-owned, individual, or state-owned). If you don’t have a registered business, you can select the “Individual” option and provide your full legal name instead. Click “Save and Continue” for each of these fields.
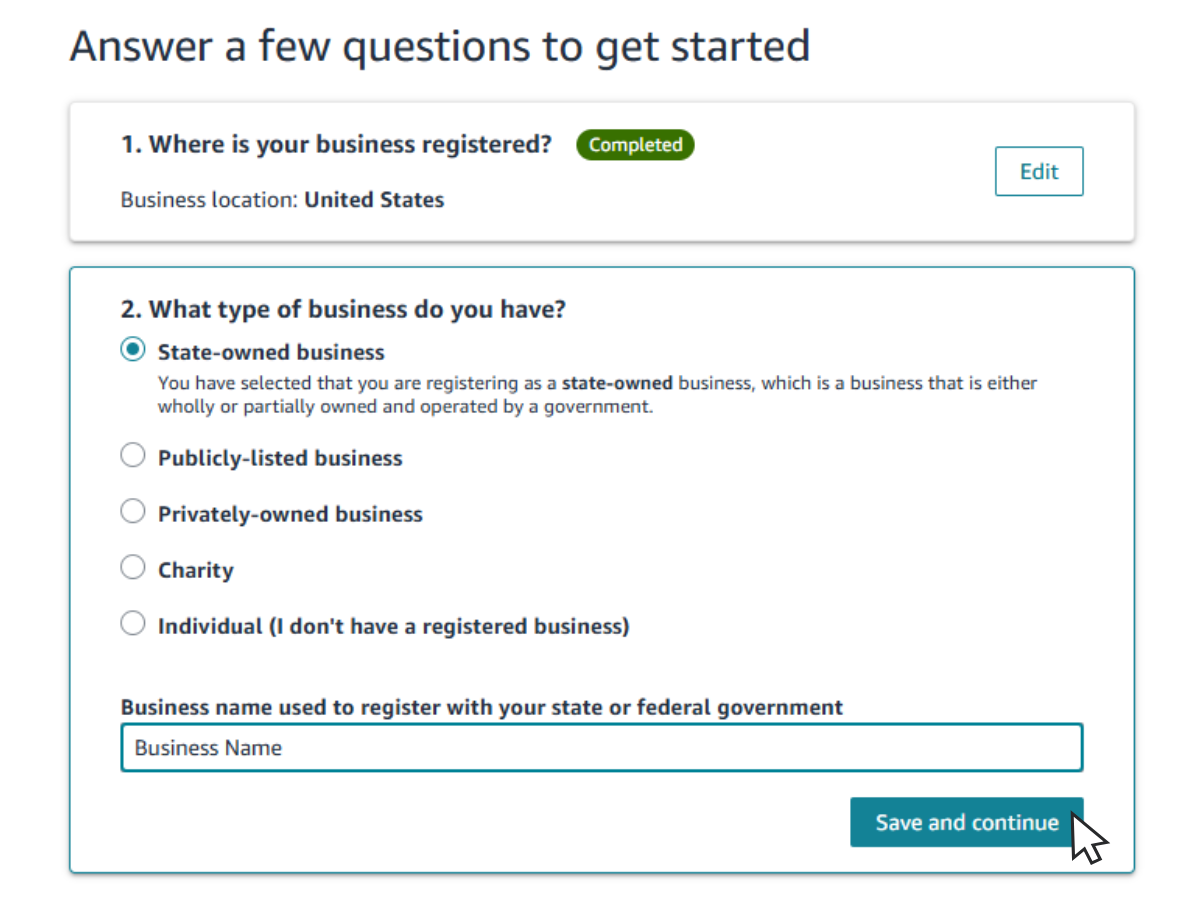
Once you finish completing the two fields of this step, click on the checkbox to confirm that your information is correct, and then click “Agree and Continue.”
The next step involves providing more detailed information about your business, which you can see in the screenshot below. If you aren’t able to view this page immediately after completing the previous steps, you can try logging out and signing up again on the Amazon Seller Central homepage using the same login credentials.
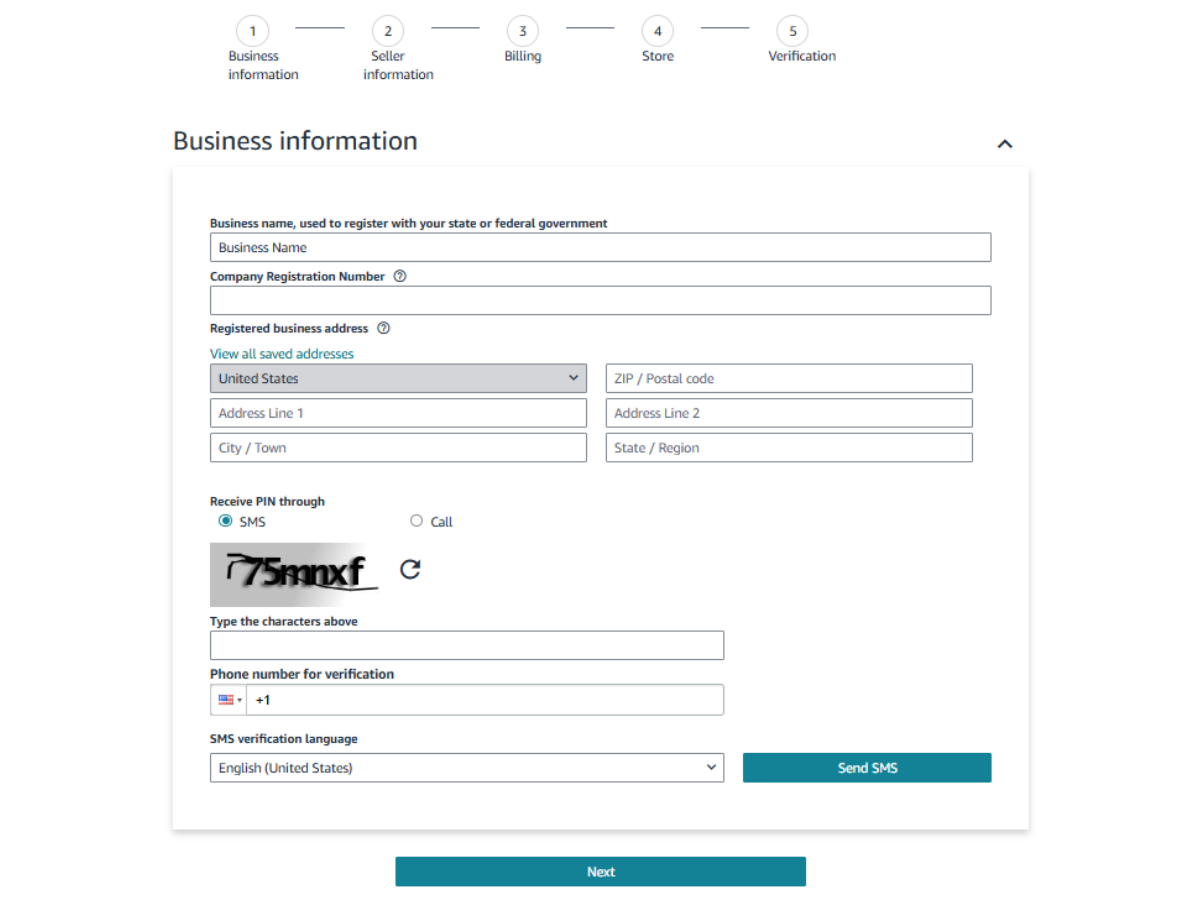
Amazon will send a one-time PIN to a personal phone number for verification before moving on to providing your seller information. After you verify your information, click “Next.”
5. Enter Your Seller Information
In the next step of the Amazon seller application process, you’ll be asked to provide information regarding a point of contact for your business. In addition to the basics of name, location, phone number, and verification (e.g. government ID), the form will ask to confirm if the contact is a beneficial owner or legal representative of the business. When you’ve finished entering all the necessary information, check the confirmation box at the bottom and click “Next.”
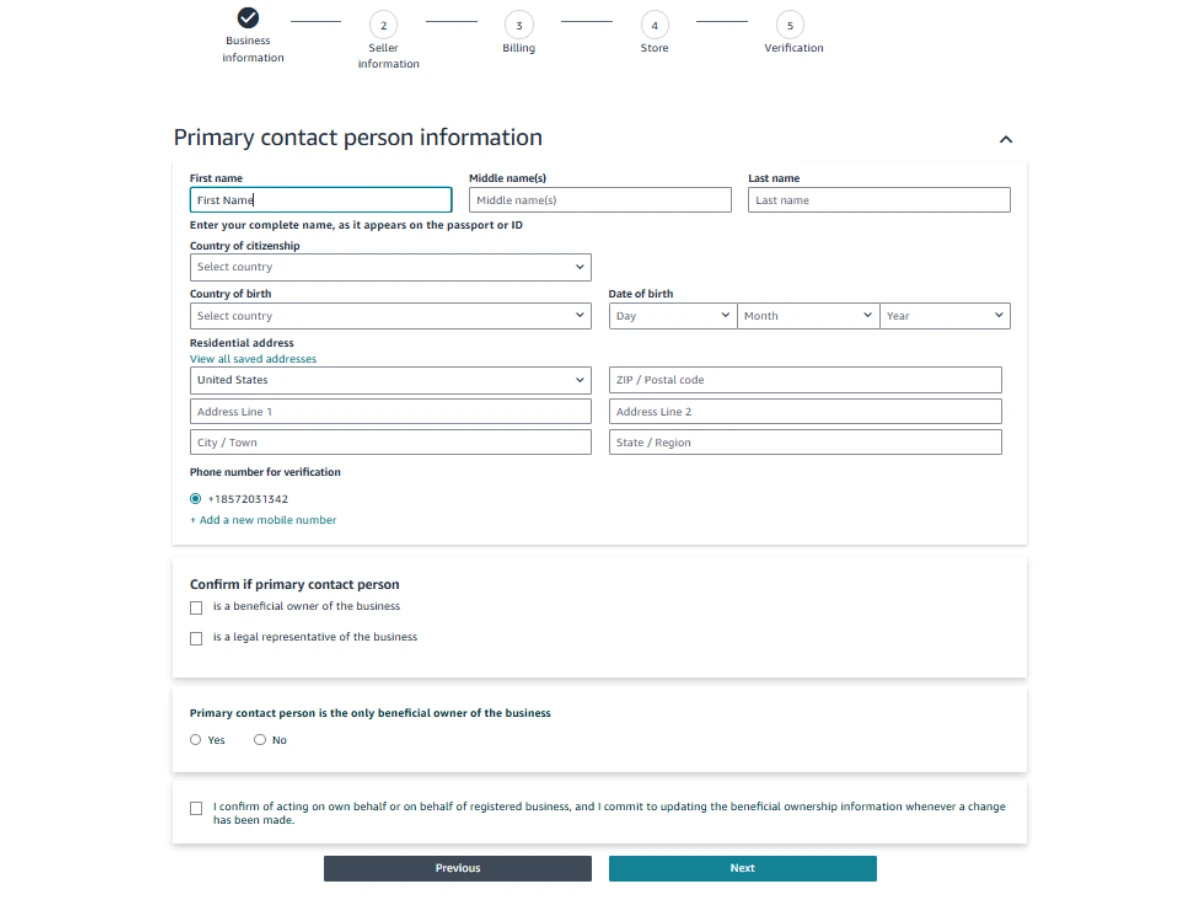
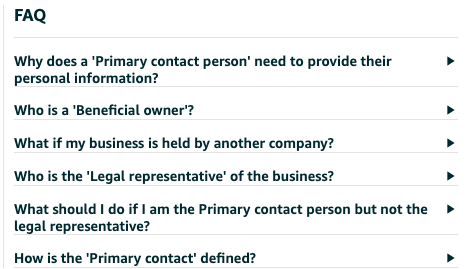
If you’re unsure about any legal terms, you can check out the FAQs that Amazon provides on the right side of each page to guide you through common roadblocks.
6. Add Your Billing Information
For this step, enter information about your bank account where Amazon can make deposits. Make sure the details match your legal business name to avoid verification issues in the future.
Additionally, as with any online purchase, Amazon will need information about your credit card (e.g. card number, expiration date, cardholder name, and billing address) that it can use to charge for fees. Make sure you enter a card that is internationally chargeable.
Keep in mind that your information may already be on file if you used the same Seller Central Amazon login as your Amazon customer account.
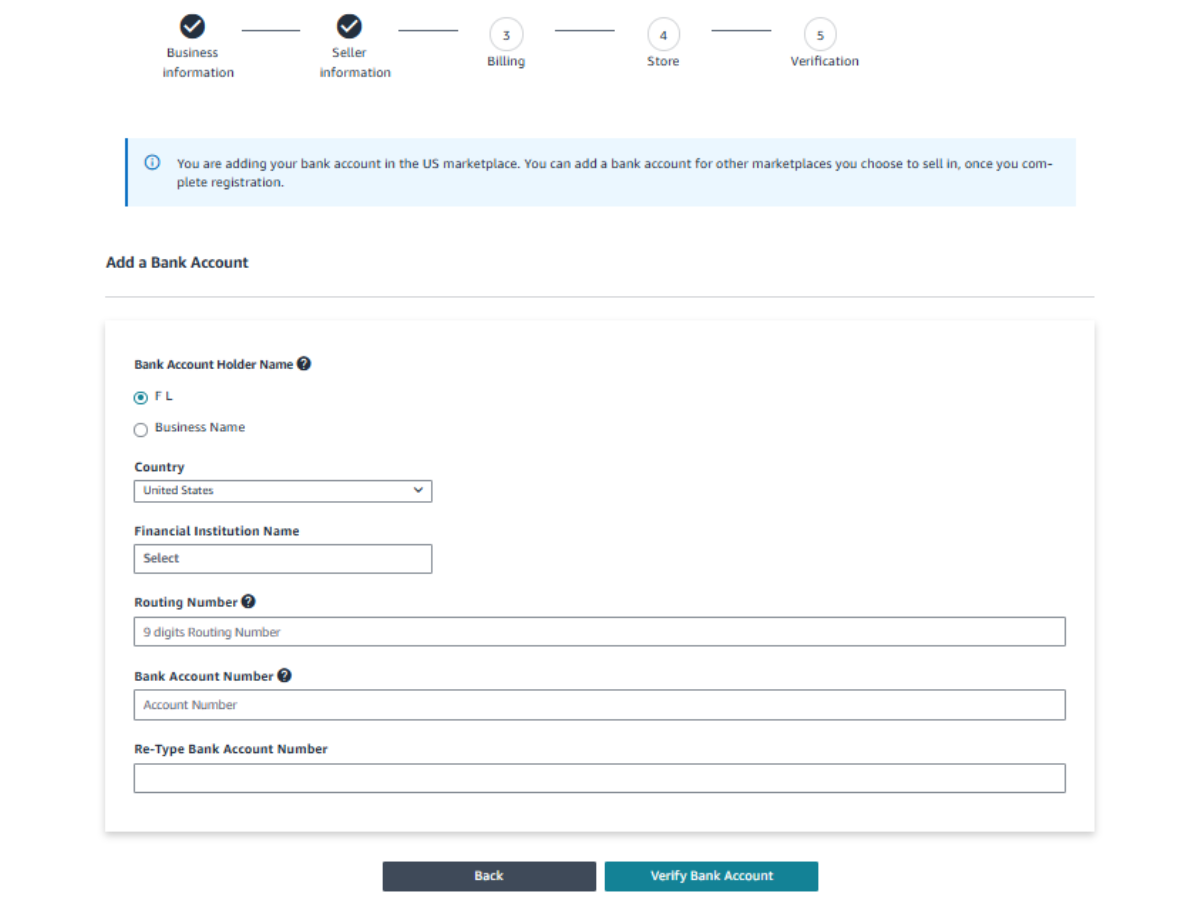
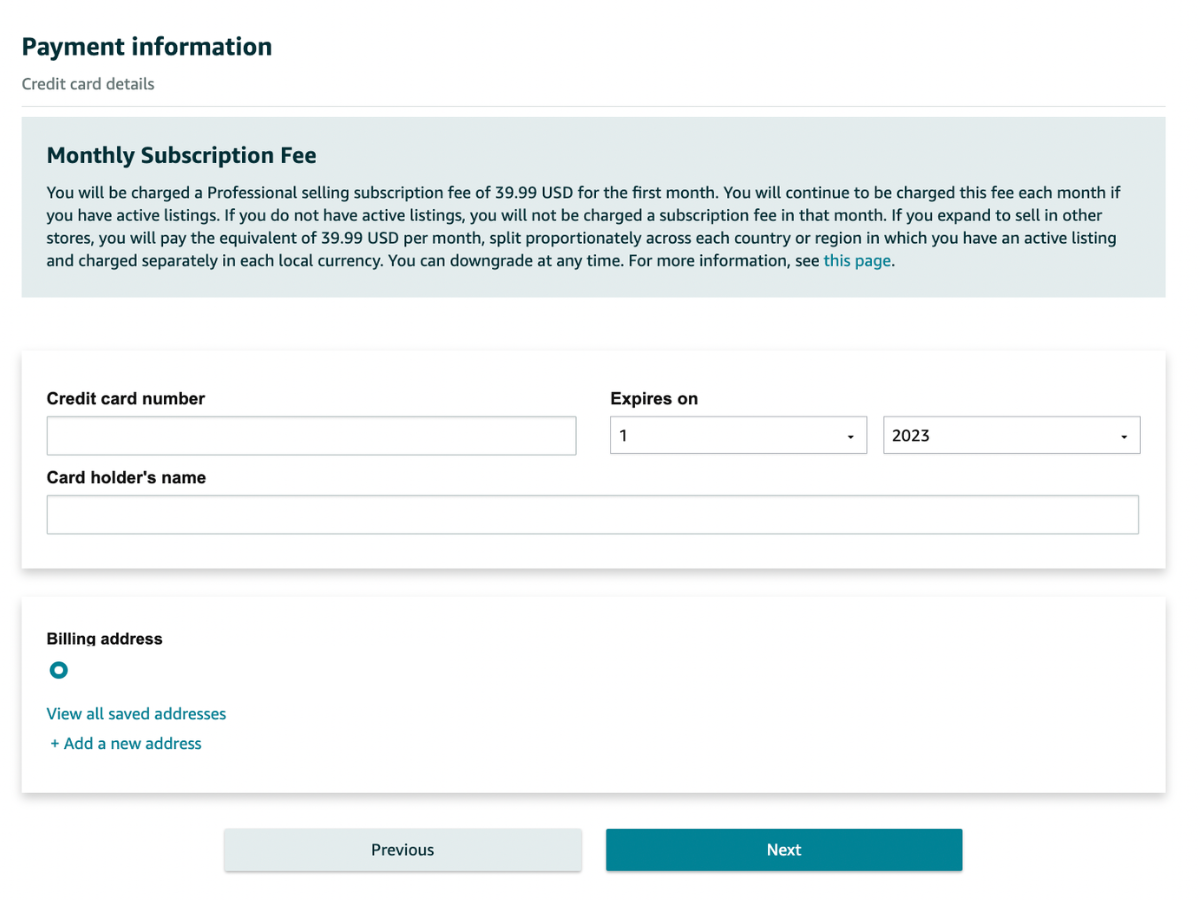
7. Enter the Store Setup Information
You’re this close to officially registering as an Amazon seller! But before the final verification, you’ll need to provide the following information:
- Your store name (you can always change this later)
- Whether or not you have Universal Product Codes (UPCs) for all your products (if you’re not sure, just click “Yes”)
- If you have any diversity certifications
- If you’re the manufacturer, brand owner, agent, or representative for any of the products you will make available on the platform
Click “Next” after you’ve provided all the necessary information.
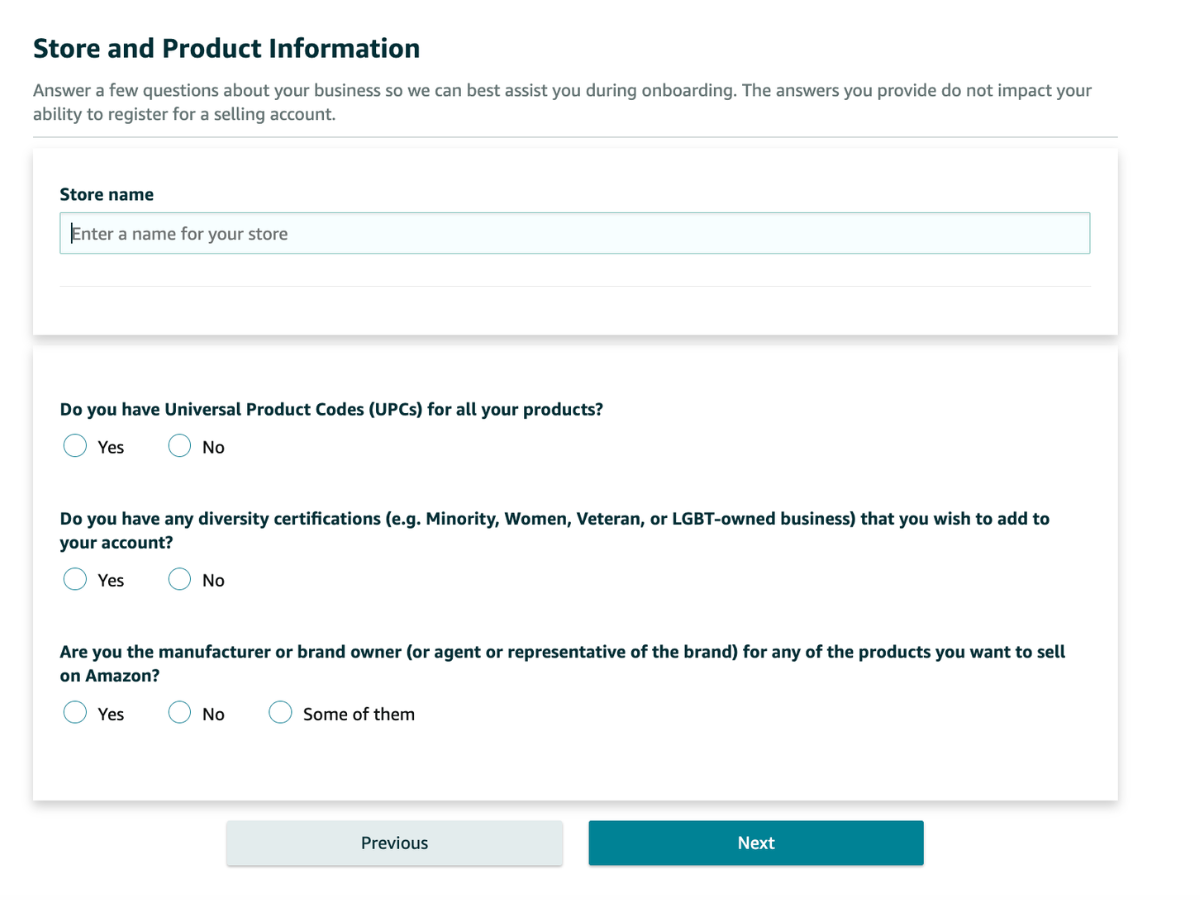
8. Verify Your Identity
The next step is to verify that you’re a human to Amazon’s standards. You’ll need to upload a document with your name, date of birth, country of birth, and citizenship. At least two sources of verification, such as a driver’s license, passport, or a recent bank account statement are needed to submit your seller registration.
Upload clear, high-quality images of your documents, and be sure your typed information matches to avoid roadblocks that can pop up during the online verification process. If you upload a recent bank account statement, remember Amazon is a global business and larger, more recognized bank accounts are likely to pass verification without issue than smaller local banks.
When you’ve finished uploading all your documents, click “Submit.”
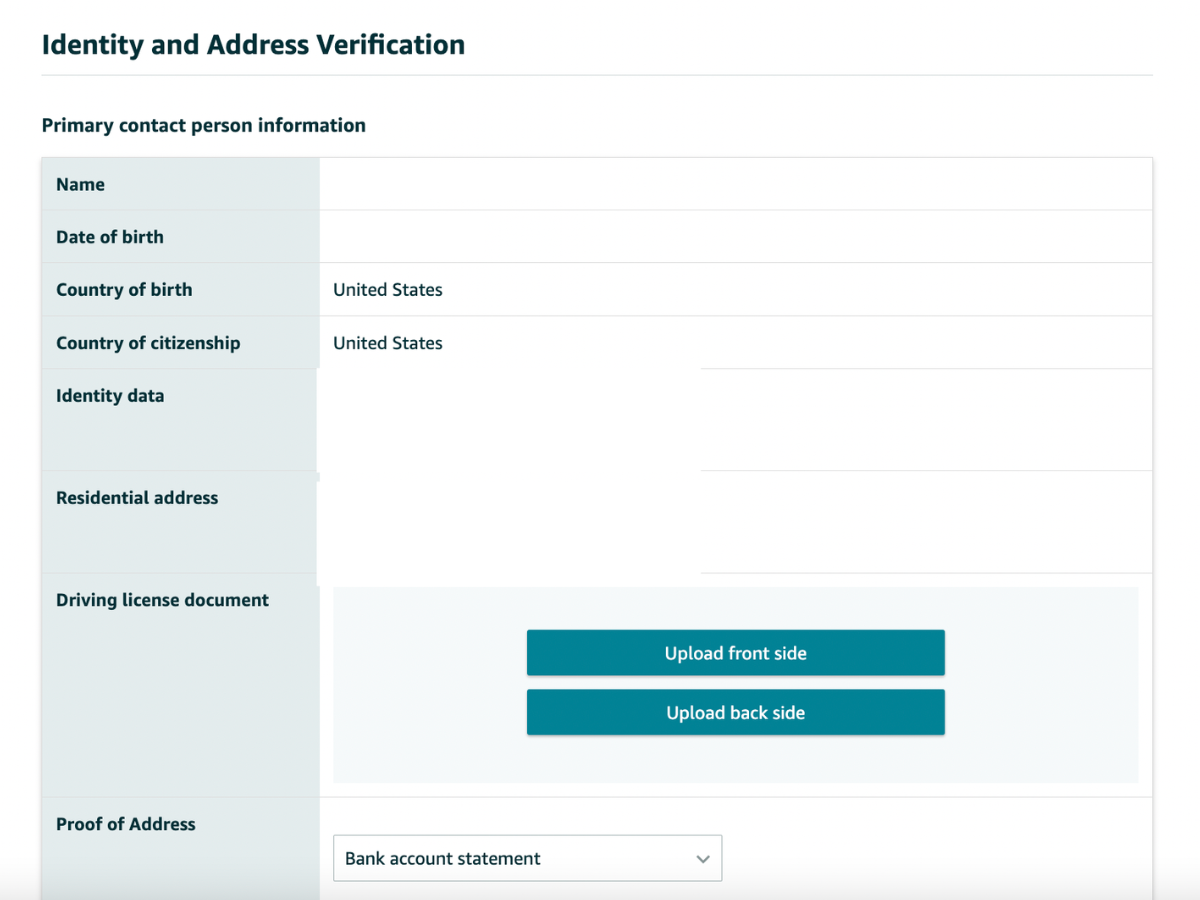
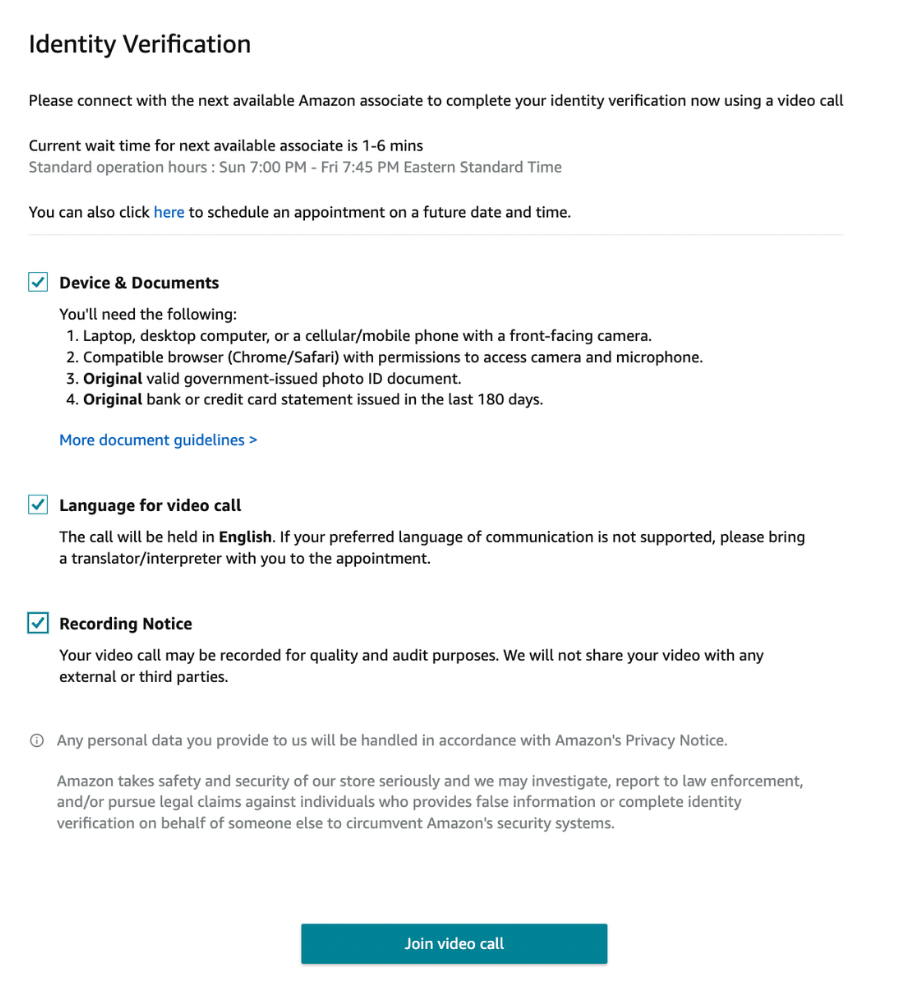
9. Complete the Identity Verification Interview
At the end of your Amazon seller setup, you may also be prompted to complete a video call with an Amazon associate to confirm your identity and verify all of your submitted documents. The verification might take some time, so during this period you should monitor your email for any updates. If you aren’t able to take a call upon completing your application, you can schedule an appointment for a future date and time. Below are some important things to note:
- Document Format Requirements: To avoid upload errors, documents should be in accepted file formats (e.g. PDF, JPEG) and under any file size limits.
- Notification of Approval: Amazon will send an email confirmation once identity verification has been successful. Once you’re verified, your Amazon business account account setup will be complete!
- Next Steps if Verification Fails: Be on the lookout for any emails regarding resubmission instructions if your documents are rejected during the verification process.
Pro Tip: If, for any reason, you encounter any errors or issues during your account setup, reach out to Amazon Seller Central support to check the status of any issues standing in the way of taking the next steps in starting your Amazon business.
Next Steps for Creating Your Amazon Seller Account
Once you’ve reviewed and submitted all of your information, all that’s left to do is wait to be approved. After that, you should be all set. Congratulations! You now know how to create an Amazon seller account and are ready to move on to the next stage of creating your online business.
For future considerations, you may want to consider investing in a market research tool to help you gain important insights into competitors and market trends. This will help you create well-informed strategies for your business and plan for the future better. Additionally, completing supplementary trainings for new Amazon sellers might be a good idea to become more familiar with the marketplace and learn the basics of building an online business. Whatever you decide to do, always keep your business top-of-mind. Happy selling!
Additional Resources:
- Check out our free ebook How To Start Selling on Amazon to move on to the next juncture of launching your online business.
- You can also download our other free ebook 3 Steps to Finding Your Next Great Product.
- For information and insights on seller expenses, check out our guide on Amazon seller taxes


